

In the first part, we looked at how we built a data pipeline required for creating data loaders using fastai. In this part, we will create different segmentation models that help us rank in the top 4% of the Kaggle Leader board.
It is often said the modeling is the easy part, but it is rarely true. Building models for any kind of problems have too many levers that can give you great results or bad results. Anyone who has participated in a Kaggle competition or built a real-world deep learning model can tell us more stories of how a particular technique that worked for a certain problem did not work on a new dataset. We are going to take a step by step approach to build a model and improve it.
If you have never built a segmentation model do not worry we will take a step by step approach.
If you have experience building segmentation models move to the sections of interest.
Unet_learner
Fastai lets us create a custom unet model based on different encoders in a line of code. We will look at what is unet, encoders, and decoders in the coming sections. For now, let’s start by creating our first model and training it. We will train/experiment each model for approximately 20 epochs and based on the results we choose the best model and use the best model to train longer and build our final solution.
dls = get_data(fold_id=0,folds=folds,size=128,bs=32)
learn = unet_learner(dls,resnet34,loss_func=lovasz_hinge,metrics=[meanapv1],n_out=1)
learn.fine_tune(20)
For consistent results, we have created a custom function called
get_datawhich returns the same data for a particularfold_idso that we can compare our results. We have split the data into 10 folds and we are using the 1st fold for all our prototyping.
Let’s look at the results and then we will look into what is an Unet architecture at a high level and build a custom Unet based model with a pre-trained encoder step by step.
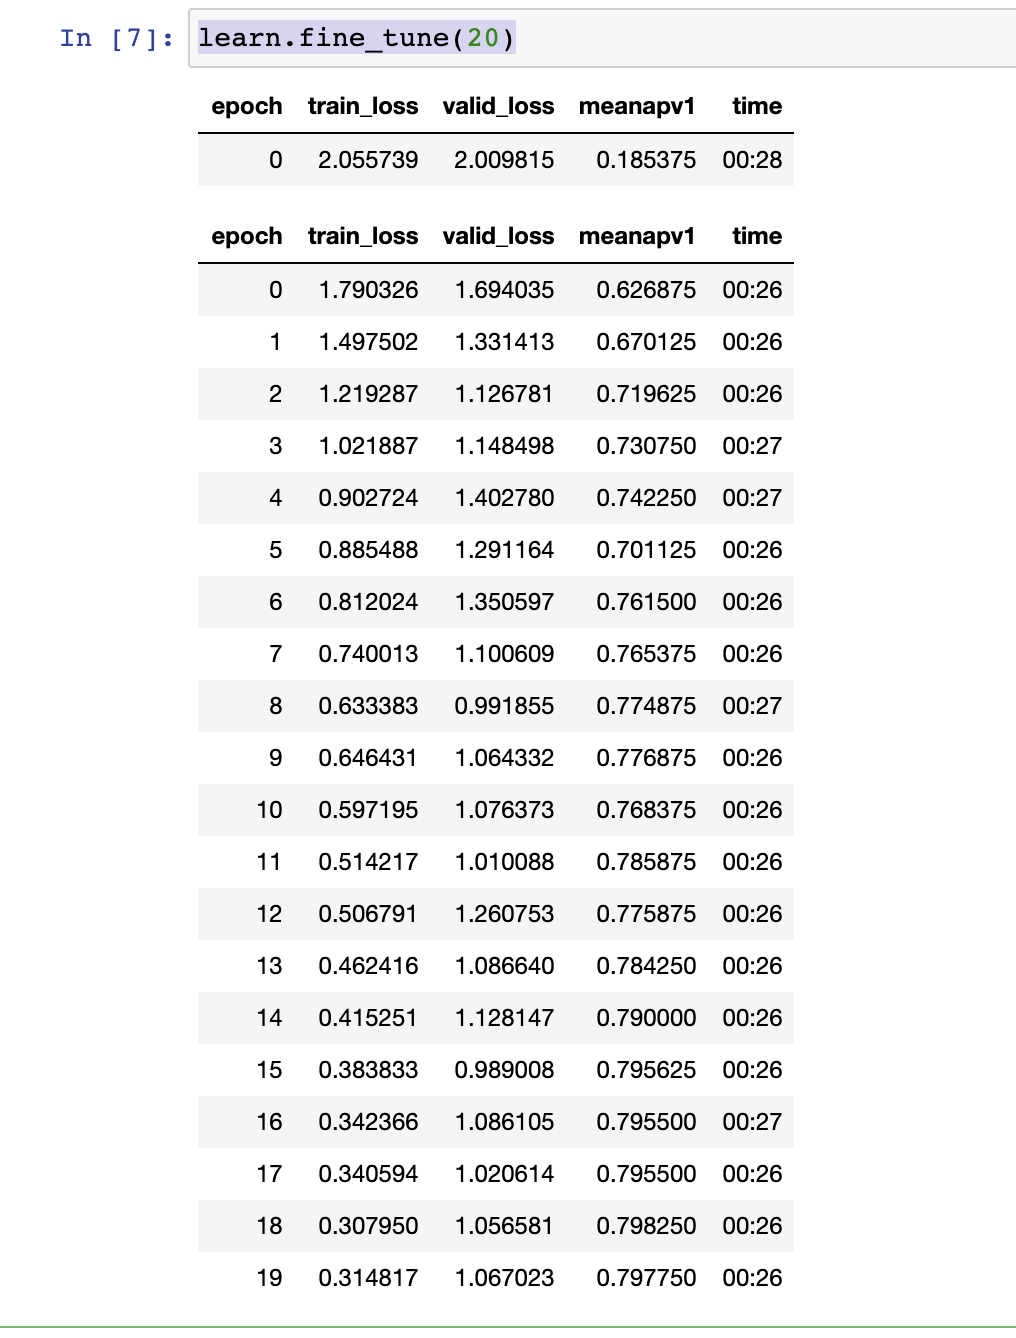
A quick observation of the above data indicates our model started overfitting as the validation loss stopped going down.
Building Unet with SE-Resnext50
Let us look at the Unet Diagram from the Unet paper.
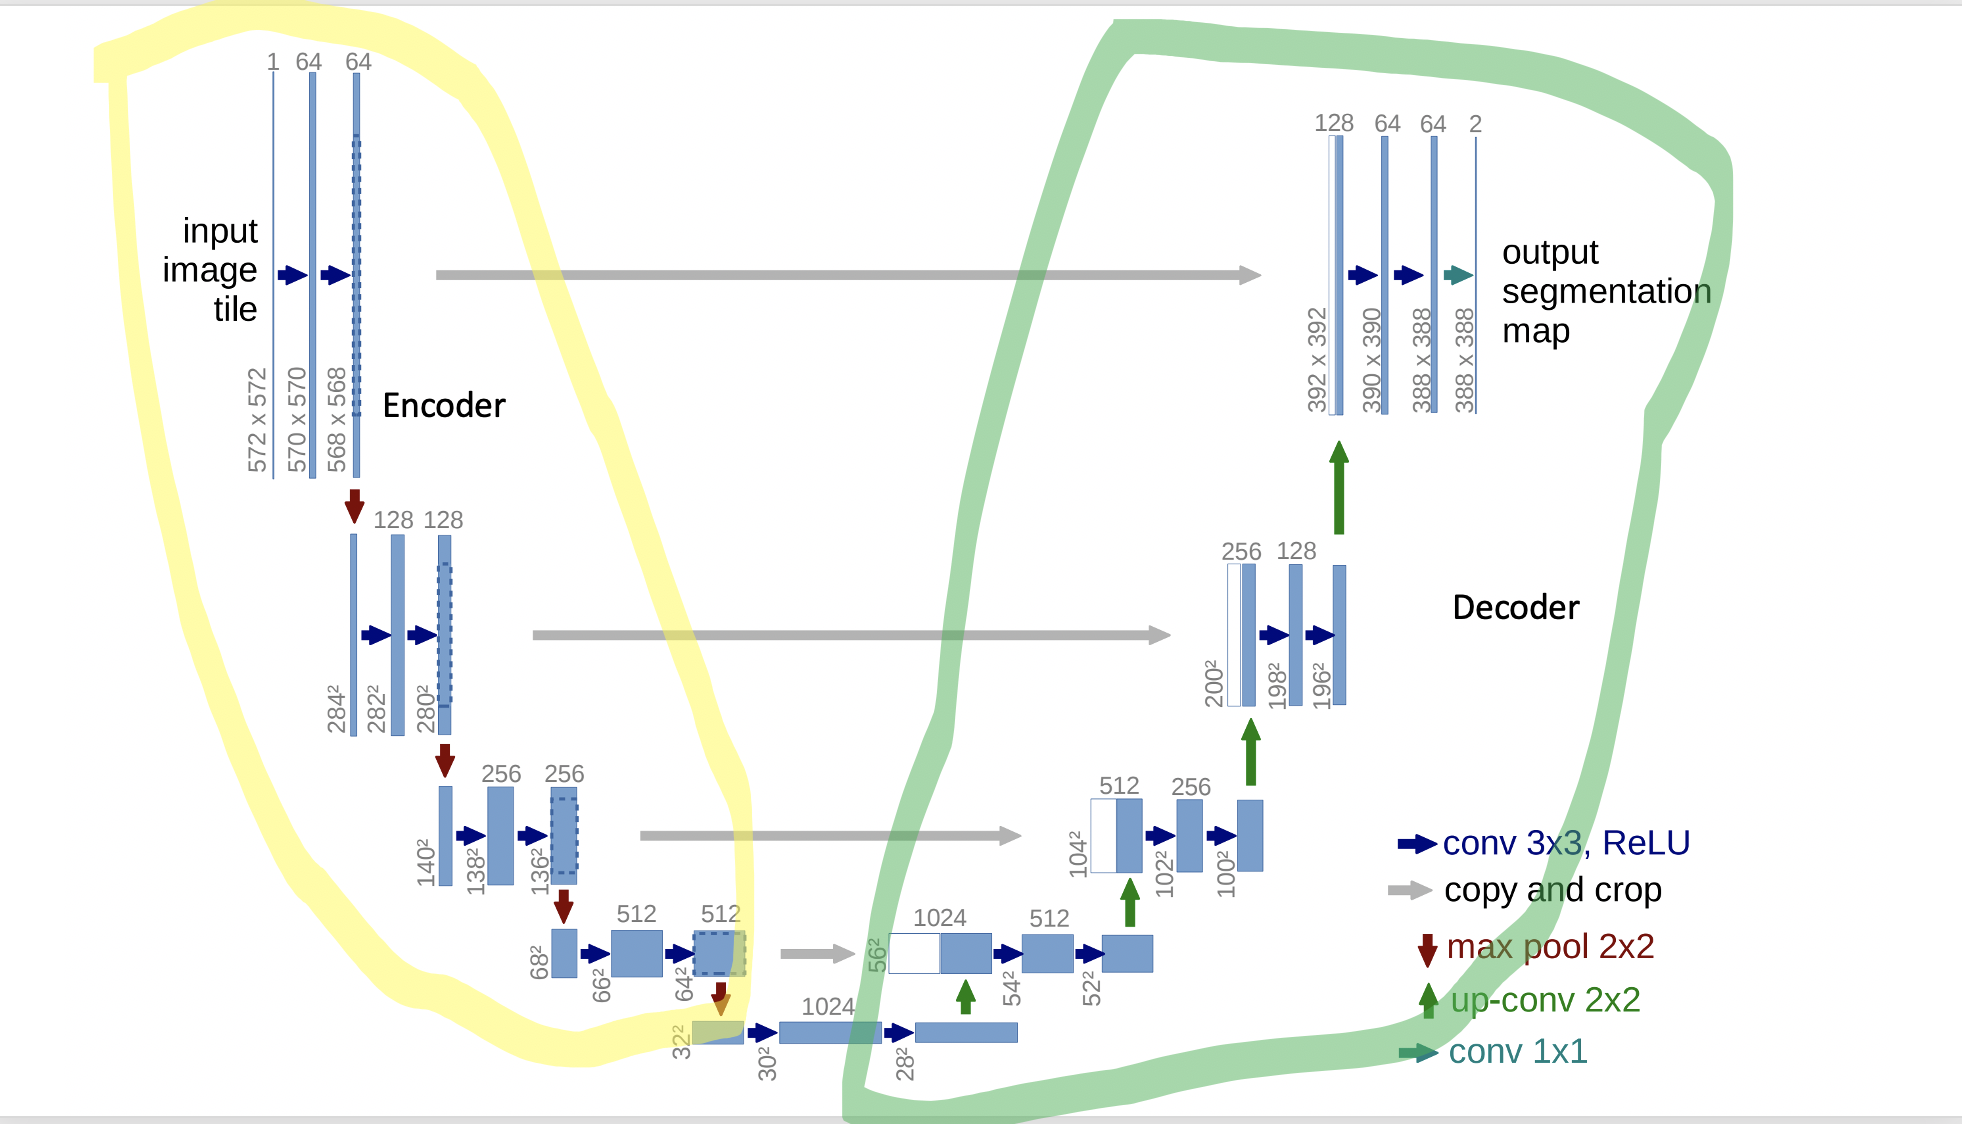
Unet architecture is an improvement done on FCN (Fully Convolutional architecture). FCN proposed a novel architecture that helped in training a network that generates a prediction for each pixel by passing images through an encoder-decoder architecture like shown in the below picture.
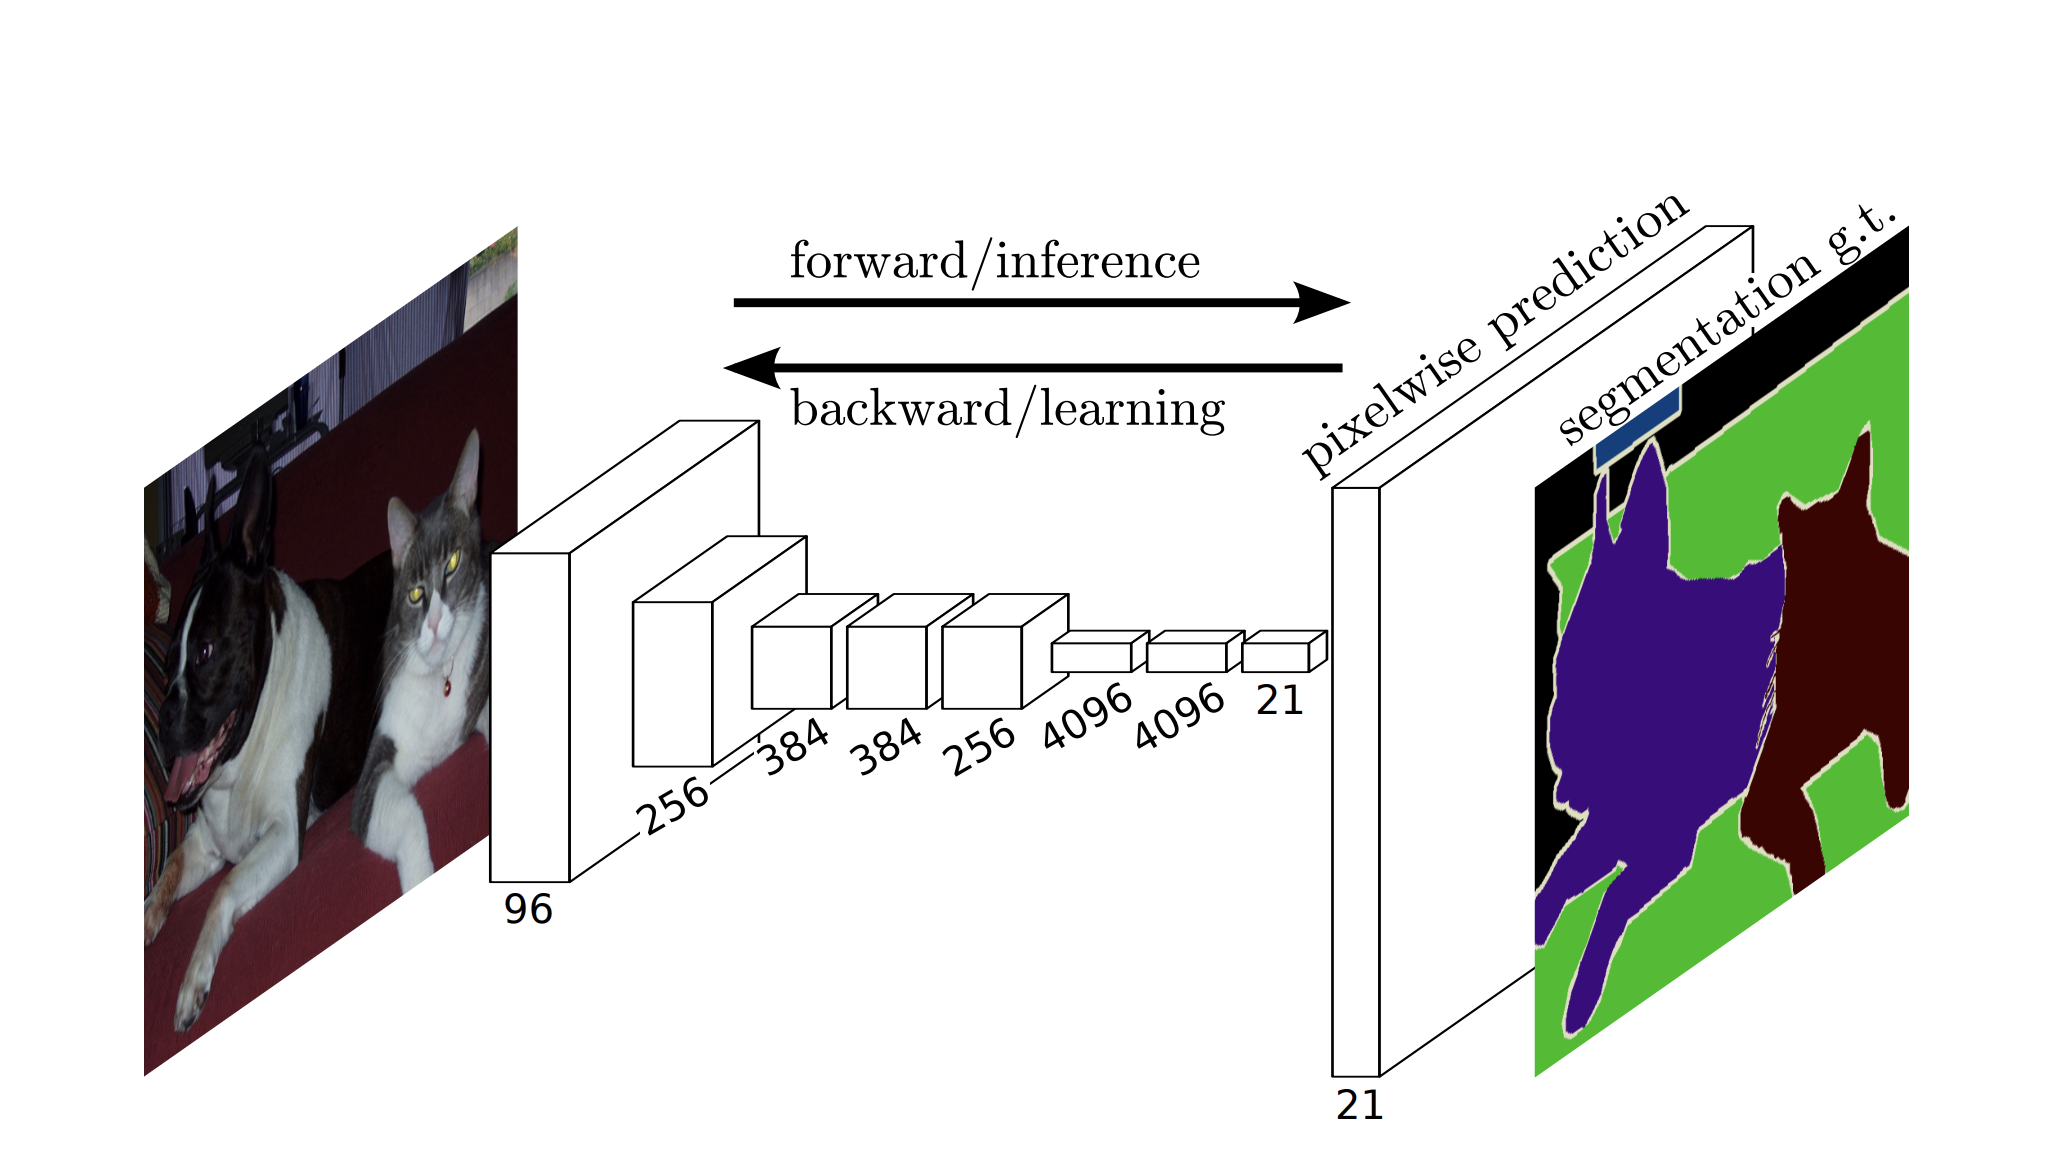
The encoder takes an image as input and passes it through multiple convolutional layers and applies the max pool to learn about the context. The decoder also applies convolutional layers, instead of the max pool it applies upsample layers to generate a matrix/tensor of the image size where each pixel contains values of prediction. The key contribution of Unet paper is the arrow lines we see in the unet image called skip connections, that let information pass easily between different levels of encoders and decoders.
There are several improvements that are made on Unet. Unet based architectures have become the norm for most of image segmentation problems. Several kaggle winning solutions are based on Unet based architectures.
One key evolution to the Unet architecture is the use of pre-trained networks like resnet34, se_resnext50 for the encoder, instead of training the entire model from scratch.
Encoder
We will use se_resnext for building our Unet model. There is a popular package called pretrainedmodels which provides a lot of pretrained models in PyTorch. For using pretrained model in a unet shaped architecture, we would just need the model till the last pooling layer. fastai provides a lot of functionalities which helps us with these small tasks. We will use a function called 'create_body' to get the model till the last pooling layers.
def get_resnext50(**kwargs):
    model_name = 'se_resnext50_32x4d'
    model = pretrainedmodels.__dict__[model_name](num_classes=1000, pretrained='imagenet')
    return model

class TGSResNext50(Module):
    def __init__(self):
        self.resnext = create_body(get_resnext50)
        self.encode1 = self.resnext[0][:-1]
        self.encode2 = self.resnext[1]
        self.encode3 = self.resnext[2]
        self.encode4 = self.resnext[3]
        self.encode5 = self.resnext[4]

    def forward(self,x):
        encode1 = self.encode1(x)
        encode1 = F.max_pool2d(encode1, kernel_size=2, stride=2)
        encode2 = self.encode2(encode1)
        encode3 = self.encode3(encode2)
        encode4 = self.encode4(encode3)
        encode5 = self.encode5(encode4)
        return encode1,encode2, encode3, encode4, encode5
In the above code, we created an architecture that returns the intermediate outputs. These outputs are used as skip connections for merging with the upsampled output of our decoder.
It is always a good idea to look at the shapes of these outputs to understand how our data is transformed and also for designing the decoder.
x,y = dls.one_batch()
m = TGSResNext50()
p = m()
' '.join(str(o.shape) for o in p)

Output: torch.Size([32, 64, 32, 32]) torch.Size([32, 256, 32, 32]) torch.Size([32, 512, 16, 16]) torch.Size([32, 1024, 8, 8]) torch.Size([32, 2048, 4, 4])
Another popular alternative approach for getting intermediate outputs is the use of PyTorch Hooks, which fastai unet_learner uses extensively.
Decoder
The decoder is responsible for converting the output of the encoder, which is of shape 2048,4,4 to the size of our mask 1,128,128. The decoder does it by applying a couple of convolution layers and upsample layers till we achieve the required size.
class Decoder(Module):
    def __init__(self,in_channels,chanels,out_channels):
        self.conv1 = ConvLayer(in_channels,chanels)
        self.conv2 = ConvLayer(chanels,out_channels)

    def forward(self,x):
        x = F.interpolate(x, scale_factor=2, mode='bilinear', align_corners=True)
        x = self.conv1(x)
        x = self.conv2(x)
        return x


class UnetResNext50(Module):
    def __init__(self):
        fs = 32
        self.resnext = TGSResNext50()
        self.center = nn.Sequential(ConvLayer(2048,2048),ConvLayer(2048,1024))
        self.decoder5 = Decoder(2048+1024,512,fs)
        self.decoder4 = Decoder(1024+fs,256,fs)
        self.decoder3 = Decoder(512+fs,128,fs)
        self.decoder2 = Decoder(256+fs,64,fs)
        self.decoder1 = Decoder(fs,fs,fs)
        self.logit = nn.Sequential(ConvLayer(fs*5,64),ConvLayer(64,32),nn.Conv2d(32,1,kernel_size=1))

    def forward(self, x):
        e1,e2,e3,e4,e5 = self.resnext(x) #'64 256 512 1024 2048'
        f = self.center(e5)
        d5 = self.decoder5(torch.cat([f, e5], 1))
        d4 = self.decoder4(torch.cat([d5, e4], 1))
        d3 = self.decoder3(torch.cat([d4, e3], 1))
        d2 = self.decoder2(torch.cat([d3, e2], 1))
        d1 = self.decoder1(d2)

        f = torch.cat((
                 d1,
                 F.interpolate(d2, scale_factor=2, mode='bilinear',align_corners=False),
                 F.interpolate(d3, scale_factor=4, mode='bilinear', align_corners=False),
                 F.interpolate(d4, scale_factor=8, mode='bilinear', align_corners=False),
                 F.interpolate(d5, scale_factor=16, mode='bilinear', align_corners=False),

        ), 1)

        logit = self.logit(f)
        return logit
Some of the key things that are happening in the above code are
- ConvLayer
- Skip connections
- Hyper columns
ConvLayer
This is a custom layer provided by fastai, which lets you easily create a convolutional block. If you have been working on Deep learning algorithms for some time, you would have created a function that returns a conv-bn-relu layer. ConvLayer does the same thing.
ConvLayer(64,32)
Output:
ConvLayer(
  (0): Conv2d(64, 32, kernel_size=(3, 3), stride=(1, 1), padding=(1, 1), bias=False)
  (1): BatchNorm2d(32, eps=1e-05, momentum=0.1, affine=True, track_running_stats=True)
  (2): ReLU()
)
Skip connections
Skip connections is a key contribution of the Unet paper and is important for the image segmentation problems as we lose important data every time we apply pooling layers. In FCN, we repeatedly apply a bunch of convolutional layers followed by upsample layers till we convert the output of the encoder to our desired size, in our case it is the size of mask 128,128. As we reach the last layers of the model, the model would lose essential information. Skip connections let us use the outputs of encoders at different levels with the corresponding decoders, thus allowing the information to be passed. In the below example we take the output of decoder5 and concatenate it with the last but one output of encoder e4 thus letting our model easily find important information.
d4 = self.decoder4(torch.cat([d5, e4], 1))
Hyper columns
In the last few years, most of the image segmentation solutions are powered by a concept called hyper columns. It is a simple and yet powerful concept. Without hypercolumns our unet model will output the last decoder output d1. The last output may not have fine-grained information or minute details required for identifying if a pixel contains salt. So hypercolumn is the use of all the outputs of decoders in our case it is d1,d2,d3,d4,d5. There is a small challenge in using all these outputs, they are all of different sizes. We resize all these outputs/tensors to the same shape and usually, that is the size of mask.
We take the output of each decoder and interpolate to get it to the same shape and apply a couple of convolution layers. This approach helps in fine-grained classification problems. For converting these tensors to the same shape we upsample them by using PyTorch interpolate functionality.
The interpolate functionality takes scale_factor as argument which tells how much the tensor has to be resized. For d2 the height and width is 64,64 so we need scale_factor to be 2 to make it of size 128,128.
f = torch.cat((                                                         #Shapes of each decoder(H,W)
         d1,                                                                        #128,128
         F.interpolate(d2, scale_factor=2, mode='bilinear',align_corners=False),    #64,64
         F.interpolate(d3, scale_factor=4, mode='bilinear', align_corners=False),   #32,32
         F.interpolate(d4, scale_factor=8, mode='bilinear', align_corners=False),   #16,16
         F.interpolate(d5, scale_factor=16, mode='bilinear', align_corners=False),  #8,8
), 1)
Training model
This is the part which fastai makes it extremely easy. When we have good architecture, we would like to train our model using some of the best practices. fastai makes it extremely easy by providing functionalities to find optimal learning rate lr_find, different optimizers, different training methods like fit_one_cycle which helps in quick convergence and these functionalities let us quickly experiment with different approaches. We will just walk through one simple approach we can follow to train our model.
In order to use all the advantages of fastai training functionalities we need a data loader, model, loss function and metrics. Let’s create a Learner object which lets us train our model.
for fold_id in range(kf):
    dls = dls = get_data(fold_id=fold_id,folds=folds,size=128,bs=32)
    learn = Learner(dls,UnetResNext50(),loss_func=symmetric_lovasz,
                    lr=1e-3,
                    wd=1e-7,
                    metrics=[meanapv1],
                    cbs=[SaveModelCallback(monitor='meanapv1',comp=np.greater,fname="best_next-model")])
    learn.fit_one_cycle(60,slice(1e-3))
    learn.save(f'resnext-{fold_id}')
We created our data loader with images of size 128, as it helps us to train and experiment faster. In the above code, we are training the model for 10 folds and saving the models respectively. At this stage, our model can put us on the LB in the top 6-7 %.
Progressive resizing
Progressive resizing is an important technique that lets us train models on images of smaller size and then fine-tune the same model on larger image sizes. We can use this technique to fine-tune our previously trained model.
for fold_id in range(kf):
    dls = get_data(fold_id=fold_id,folds=folds,size=224,bs=16)
    learn = Learner(dls,UnetResNext50(),loss_func=symmetric_lovasz,
                    lr=1e-3,
                    wd=1e-7,
                    metrics=[meanapv1],
                    cbs=[SaveModelCallback(monitor='meanapv1',comp=np.greater,fname="best_next-model")])
    learn.load(f'resnext-{fold_id}')
    learn.fit_one_cycle(20,slice(1e-3))
    learn.save(f'resnext-224-{fold_id}')
It is a simple technique, that saves a lot of GPU hours ($/hr) and also improves the accuracy. Our new model trained on images of size 224 gave a rank in the top 4%. We can try training with larger images say 256 to see if it improves the result.
Generating predictions for test data
The data in the test/real-world data is different than our training data in one important way, it mostly will not have labels. So often we need to create a slightly different dataset/data loader that does not contain labels. fastai again comes to our rescue. We can simply do it as below.
test_files = get_image_files(test_path)

test_dl = dls.test_dl(test_files)
The data loaders object we created earlier has a functionality called test_dl which takes the path to our test images and gives us the test data loader with an empty tensor for labels.
Test time augmentation
fastai comes with a tta which lets us generate predictions by predicting on different augmented data. However, at the time of writing the blog, I was unable to figure out how to use it when I just wanted to try a horizontal flip. For image segmentation problems horizontal flip is the commonly used test time augmentation technique. So we will create our simple tta do apply horizontal flip by learning how to create a new data loader with a specific augmentation.
test_dl_f = test_dl.new( after_batch=[*test_dl.after_batch,Flip(p=1.0)])
In the above code, we are adding a new augmentation technique Flip with a probability of 1 that is always, in addition to all the transformations that are required for creating our test_dl. So now we have 2 data loaders, one for generating batches of test images and another one generating batches of flipped test images.
Prediction
fastai makes it easier by providing a predict functionality which lets us apply the model on a particular dataloader.
def get_k_fold_preds(kf,sz=224):
    preds = np.zeros(shape = (18000,sz,sz))
    for fold_id in tqdm(range(kf)):
    learn.load(f'resnext-224-{fold_id}')
    test_preds = array(learn.get_preds(dl=test_dl)[0].squeeze())
    with test_dl_f.dataset.set_split_idx(0):
    test_preds_f = array(learn.get_preds(dl=test_dl_f)[0].squeeze())
    for i,im in enumerate(test_preds):preds[i]+= im
    for i,im in enumerate(test_preds_f):preds[i]+= np.fliplr(im)
    return preds/kf*2
The above function generates predictions for our k-fold models and returns the average of predictions. Most of it is self-explanatory, except for the below code.
with test_dl_f.dataset.set_split_idx(0):
    test_preds_f = array(learn.get_preds(dl=test_dl_f)[0].squeeze())
By default fastai applies augmentation for the training dataset. Even though we apply augmentation for our test dataset, it will not be applied. In order to apply we need to pass 0 to set_split_idx to make fastai treat it as a training dataset and apply augmentation.
End
We have learnt how to build a successful pipeline for building a state of art image segmentation pipeline that easily ranks in top 4% of kaggle LB. In the process we also saw how fastai2 helps us in different process of our entire pipeline. We can try some simple techniques to improve the model. Some of the steps that you can try are
- Try a different encoder like resnet34, senet154, xresnet
- Try adding attention layers to the decoder.
- Add FPA to the center block in the Unet.
- Train with Pseudo labels as suggested here.
Find links to the complete notebooks, there is also another notebook which is based on resnet34, which also implements things like Deep supervision and classifier. If you want to quickly try out this project or use this technique in your cool project then check out JarvisCloud - A simple and affordable GPU cloud platform.