
Introduction
In this competition, we will be predicting engagement with a shelter pet's profile based on the photograph for that profile. Along with the image of each pet, we are also provided Metadata for them that consists of different features like focus, eyes, etc. We aim to somehow utilize both images as well as tabular data in the best possible way to minimize the error rate.
This blog briefs about the Petfinder.my Pawpularity Contest hosted on Kaggle. I will also go through the training and inference pipelines to cover up most details. Complete code is also available on Kaggle Swin inference 384x384 [only Images] w/ comments

About Dataset
We are provided with train and test datasets comprising CSV files and an image data folder.
Train Data
- Train.csv: Consists of unique Ids, meta-features, and the target variable "Pawpularity"
- It consists of 9912 sample images with a unique Id.
- Train Images: A directory train consisting of all the images corresponding to the respective Id.
Test Data
- Test.csv: It consists of unique Ids and meta-features without any target provided. We have to use these data to make predictions.
- Test Images: A directory test consisting of all the images corresponding to the respective Id.
The submission file should consist of 2 columns:
- Id: Unique ID
- Pawpularity: Predictions on test data
Meta Features
Each feature is described in detail by the host of the Kaggle Competition as below.
- Focus - Pet stands out against the uncluttered background, not too close / far.
- Eyes - Both eyes facing front or near-front, with at least one eye/pupil decently clear.
- Face - Decently clear face, facing front or near-front.
- Near - Single pet taking up a significant portion of photo (roughly over 50% of photo width or height).
- Action - Pet in the middle of an action (e.g., jumping).
- Accessory - Accompanying physical or digital accessory/prop (maybe a toy or digital sticker), excluding collar and leash.
- Group - More than one pet in the photo.
- Collage - Digitally-retouched photo ( i.e. with digital photo frame, a combination of multiple pictures).
- Human - Human in the photo.
- Occlusion - Specific undesirable objects blocking part of the pet like human, cage, or fence. Note that not all blocking objects are considered as occlusion.
- Info - Custom-added text or labels (i.e. pet name, description).
- Blur - Noticeably out of focus or noisy, especially for the pet's eyes and face. For Blur entries, the "Eyes" column is always set to 0.
Understanding Evaluation Metric - RMSE
In this competition, our submissions will be evaluated on the RMSE(Root Mean Squared Error) between the predicted pawpularity and ground truth.
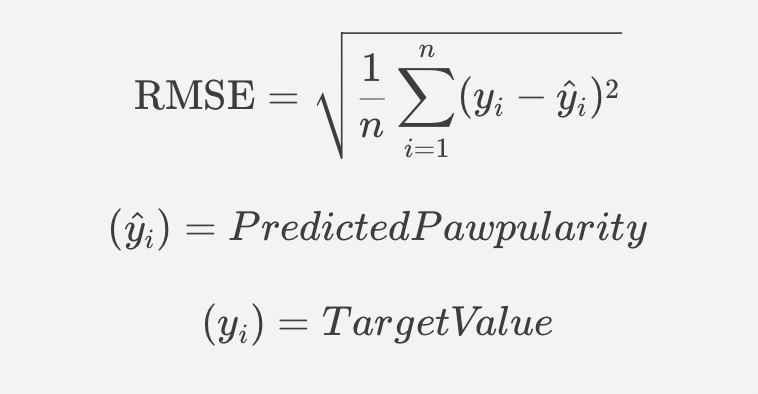
Where target values lie between range 0 - 128.
Okay, enough explaining the dataset and metric, let's go through baseline training code for better understanding.
Training With Fastai
In the code, we will be using the fastai deep learning framework to train the model. Models are trained uisng large batch size(~24) on the Aceus.com platform that offers modern and extremely easy to launch GPU instances.
Importing Necessary Libraries
import os

import fastai
import os
import warnings
from pprint import pprint
from glob import glob
from tqdm import tqdm
from fastai.vision.all import *
import torch

import numpy as np
import pandas as pd
import matplotlib.pyplot as plt
from timm import create_model

#Importing Data loaders

from sklearn.model_selection import StratifiedKFold
from torchvision.io import read_image
from torch.utils.data import DataLoader, Dataset

#Augmentation & Preprocessing Modules

import albumentations
from albumentations.pytorch import ToTensorV2
from albumentations import ImageOnlyTransform
import random
import timm
import cv2

#For enabling fp16

from torch.cuda.amp import autocast, GradScaler

import warnings
warnings.filterwarnings('ignore')    ##ignore warning

device = torch.device('cuda' if torch.cuda.is_available() else 'cpu') ### Enabling use of cuda
Defining Class of Config
Creating a class consisting of configurations is important if you want to run faster experiments. You do not have to search every parameter in the code for tweaking it.
In the config dictionary defined below, I will also brief the use of each parameter in the code.
- Model_name:- (String) Timm model name which you want to use.
- pretrained:- (Boolean) Whether you want to use pre-trained imagenet weights of the model
- train_dir:- (String) Path to train image directory
- train_csv:- (String) Path to train CSV location
- test_dir:- (String) Path to test image directory
- test_csv:- (String) Path to test CSV location
- sample_csv:- (String) Path to sample submission CSV given by hosts.
- image_size:- (int) What image size to use for training the model
- Batch_size:- (int) What batch size to use for training the model
- Weight_decay:- (Float) Parameter for optimizer.
- n_fold:- (int) Number of splits to made in the training kfold.
- trn_fold:- (list) List of folds on which the model has to be trained.
- model_dir:- (String) Output path for model.
- train: (Boolean) training or inference.
class Config:
    model_name='swin_base_patch4_window12_384'  # which model to use
    pretrained = False # enable pretrained weights
    train_dir = '../input/petfinder-pawpularity-score/train' # Train Image Directory
    train_csv = '../input/abhi-folds-petfinder/train_10folds.csv' # Train Csv Location

    test_dir = '../input/petfinder-pawpularity-score/test' # Test Image Directory
    test_csv = '../input/petfinder-pawpularity-score/test.csv' # Test Csv Location
    sample_csv = '../input/petfinder-pawpularity-score/sample_submission.csv' # Sample Submission

    image_size= 384   # Image Size for training / inference
    num_workers=4  #number of worker
    targets = 1  # number of targets
    batch_size=6 # Batch size
    weight_decay=1e-4  #Weight decay for optimizer
    seed=42 # SEED
    n_fold=10  #No of folds
    trn_fold=[0, 1, 2, 3,4,5,6,7,8,9]  #Folds to be used in training / inference
    train=False
    model_dir = '../input/petfinder-v0-models/exp0'  # Saved models directory
Defining Dataset
Let's define a class for Pet data as PyTorch DataSet, which will further be used by DataLoaders.
Currently, the data pipeline does not utilize any of the meta-features and is only limited to training on image datasets.
We are training on three channels using RGB images and going to apply augmentations.
Targets are divided by a scale of 100 for training it with BCElogitsLoss for better regularisation of the models.
class PetDataset:
    def __init__(self, df,image_path, augmentations):
        self.image_path = image_path
        self.df = df
        self.augmentations = augmentations

    def __len__(self):
        return len(self.df)

    def __getitem__(self, item):
        id_ = self.df.Id.iloc[item]
        path = f'{self.image_path}/{id_}.jpg' # Getting Image paths for samples

        targets = self.df.Pawpularity.iloc[item] # Target value for samples
        image = cv2.imread(path)  # Reading Image
        image = cv2.cvtColor(image, cv2.COLOR_BGR2RGB)  # Converting BGR to RGB images

        if self.augmentations is not None:
            augmented = self.augmentations(image=image)  # Apply Augmentations
            image = augmented["image"]

        image = np.transpose(image, (2, 0, 1)).astype(np.float32)
        image = torch.tensor(image, dtype=torch.float)

        targets = torch.tensor(targets, dtype=torch.float) / 100  # For classification
        return image, targets
Augmentations
We use the albumentations library that offers many varieties of augmentations to play with for our pet images.
We are using mainly RandomResizedCrop, RandomBrightnessContrast augmentations for training data. We normalise train images. We are not applying any augmentations for validation data.
Although, Both training and validation images are resized and normalised with mean=[0.485, 0.456, 0.406], and std=[0.229, 0.224, 0.225].
def get_transforms(*, data):

    if data == 'train':
        return albumentations.Compose(
                transforms=[
                albumentations.RandomResizedCrop(Config.image_size, Config.image_size, scale=(0.85, 1.0)),

               albumentations.HorizontalFlip(p=0.5),
               albumentations.ShiftScaleRotate(p=0.5),
               albumentations.ColorJitter(brightness=0.1, contrast=0.1, saturation=0.1,p=0.4),
               albumentations.HueSaturationValue(hue_shift_limit=10, sat_shift_limit=10, val_shift_limit=10, p=0.7),
               albumentations.RandomBrightnessContrast(brightness_limit=(-0.2,0.2), contrast_limit=(-0.2, 0.2), p=0.7),
               albumentations.Normalize(
            mean=[0.485, 0.456, 0.406],
            std=[0.229, 0.224, 0.225],
            max_pixel_value=255.0,
            p=1.0,
        ),
#             ToTensorV2()
                ])

    if data == 'valid':
        return albumentations.Compose([
            albumentations.Resize(Config.image_size, Config.image_size),   # Resize all images to 384 image size.
            albumentations.Normalize(
            mean=[0.485, 0.456, 0.406],
            std=[0.229, 0.224, 0.225],
            max_pixel_value=255.0,
            p=1.0,
        ),

        ])
The new metric function is defined by multiplying RMSE calculated by a factor of 100. This is done to deduce the same metric as of competition evaluation because during training we were training with 1/ 100 of target values.
def petfinder_rmse(input,target):
    return 100*torch.sqrt(F.mse_loss(F.sigmoid(input.flatten()), target))
Defining Model Class
I created a model class that uses timm library to import a backbone along with pre-trained weights, and further apply a classifier head to train it based on the competition's requirement.
class PetModel(nn.Module):
    def __init__(self, config):
        super().__init__()
        self.config = config
        self.backbone = timm.create_model(self.config.model_name, pretrained=self.config.pretrained)
        self.n_features = self.backbone.head.in_features
        self.backbone.head = nn.Identity()
        self.fc = nn.Linear(self.n_features, self.config.targets)

    def forward(self, image):
        feature = self.backbone(image)
        output = self.fc(feature)

        return output
Dataloader and Training
Data loaders are called and stored in variables train_dl, valid_dl for the respective training and validation datasets.
Fastai's Learner is defined with the model and dataloaders , along with the loss function and metrics to be used for evaluation.
I also used a few callbacks like early stopping, etc to prevent overfitting of the model.
train_ds = PetDataset(training_fold,Config.train_dir,augmentations = get_transforms(data='train'))
valid_ds = PetDataset(validation_fold,Config.train_dir,augmentations = get_transforms(data='valid'))

train_dl = torch.utils.data.DataLoader(train_ds, batch_size=bs, num_workers=Config.num_workers,pin_memory=False)
valid_dl = torch.utils.data.DataLoader(valid_ds, batch_size=bs*2, num_workers=Config.num_workers,shuffle=False,pin_memory=False)

model = PetModel(Config)

learn = Learner(dls, model, loss_func=BCEWithLogitsLossFlat(), metrics=[petfinder_rmse],cbs=[early_stop,save_callback,logger]).to_fp16()

learn.fit_one_cycle(Config.epochs, Config.lr, wd=Config.weight_decay)

learn.save(f'{kernel_type}/fold_{fold_num}')
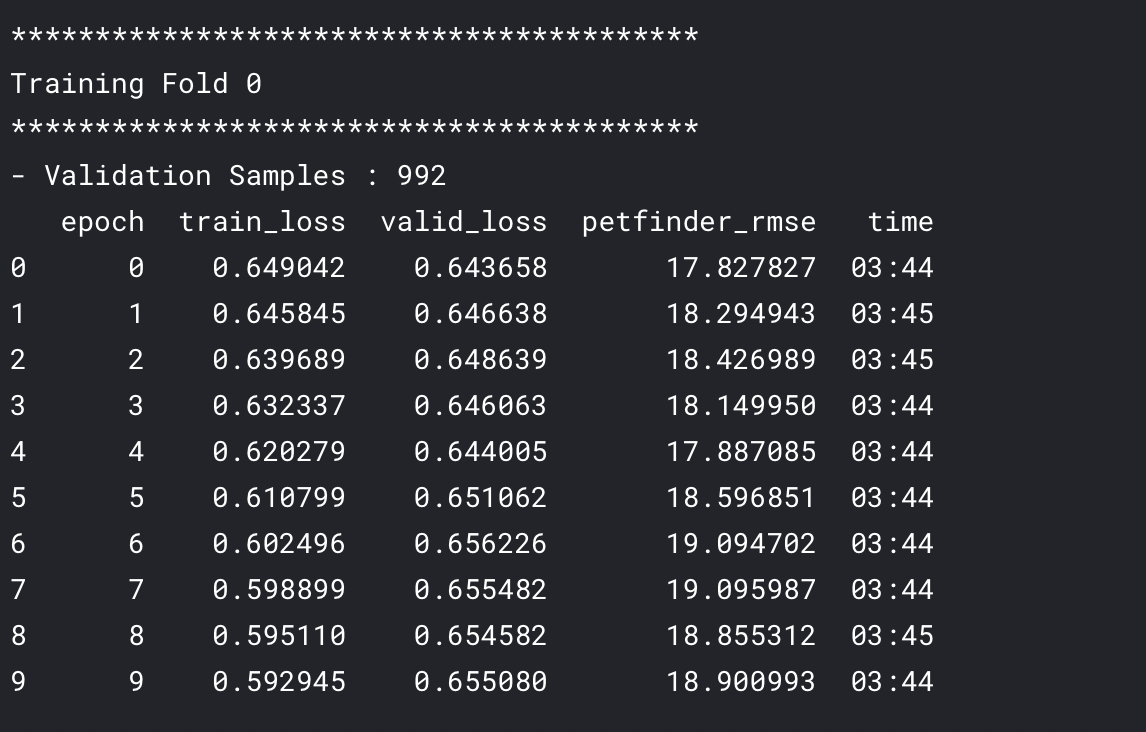
Results of a fold during training look somewhat like below
Inference
Finally, we use the trained models for inference on Kaggle to generate the submission predictions on the test dataset. Code looks something like shown below.
Store the given predictions in sample submission file for the given ids and submit to Kaggle :)
test_dl = torch.utils.data.DataLoader(test_ds, batch_size=bs, num_workers=4, shuffle=False,pin_memory=True) #test loader

        preds = []
        for xb, _ in progress_bar(test_dl):
            with torch.no_grad():
                output = learn.model(xb.cuda())    # Making predictions
            preds.append(torch.sigmoid(output.float()).squeeze().cpu()) # storing predictions in list
        preds = torch.cat(preds).numpy().flatten()
Scope of improvement
The current code I present is a baseline that scores 18.999 on the public leaderboard in the competition. There could be several improvements made in the code for improving your rank. Some of which are summarised below:
- Test Time Augmentation
- Knowledge Distillation
- Using Meta features by concatenating them with image-generated features.
- Tuning schedulers & optimizer used.
- Using two heads approach shared by many in notebooks forum.
- Cutmix / Mixup based Augmentations
- Ensembling with models trained on Meta features
- Arcface Module
- Extracting some information from duplicates