
Why it is important to understand ResNet?
ResNets are the backbone behind most of the modern computer vision architectures. For a lot of common problems in computer vision, the go-to architecture is resnet 34. Most of the modern CNN architectures like ResNext, DenseNet are different variants to original resnet architecture. In different subfields of computer vision like object detection, image segmentation resnet plays an important role as a pre-trained backbone.

Understanding the functioning of the resnet model helps us while building custom architectures for problems like image classification, segmentation, and object detection. For example, when using the resnet model as the backbone for image segmentation using U-net architecture, we create skip connections between different blocks of encoder and decoder. So it becomes a lot easier to understand and build these architectures later on since we already know how resnet is built. Understanding these architecture helps in guessing the output shapes of each resnet block which is in turn added to different decoder blocks.
ResNets were introduced in the Deep Residual Learning for Image Recognition paper by Kaiming He et al.
In this post, we will look at a slightly simplified version of resnet 34 architecture found in torchvision repository.
Residual Block
Residual block is an important building block of resnet architecture. In old architectures like VGG16, convolution layers are stacked along with batch normalization and non-linear activation layer like relu. This approach worked well for a small number of layers, VGG models were able to stack 16 and 19 layer models using this approach. These were considered as deeper architectures when they were published. Some of the modern architectures can go easily to 50, 100, 150, and more. To make this depth possible resnet architecture introduces a simple concept of adding inputs(intermediate inputs) to the output of a bunch of convolution blocks(CONV-BN-RELU).
Adding the input to the output also called skip-connections allows for smoother gradient flow during back-propagation and it lets important features carry until the end. Skip-connection doesn't add any additional computational load on the network. This technique of adding input from previous layers to the output of next intermediate layers has become so popular that we can see it being applied in a lot of other architecture used for image segmentation problems like unet architecture and even in RNN's.
Adding the input to an intermediate output is called with different names like identity mapping, residual, and skip connections (skips 2 intermediate layers) or shortcut connections.
InDensenetarchitecture, instead of adding, we end up concatenating the input to the outputs.
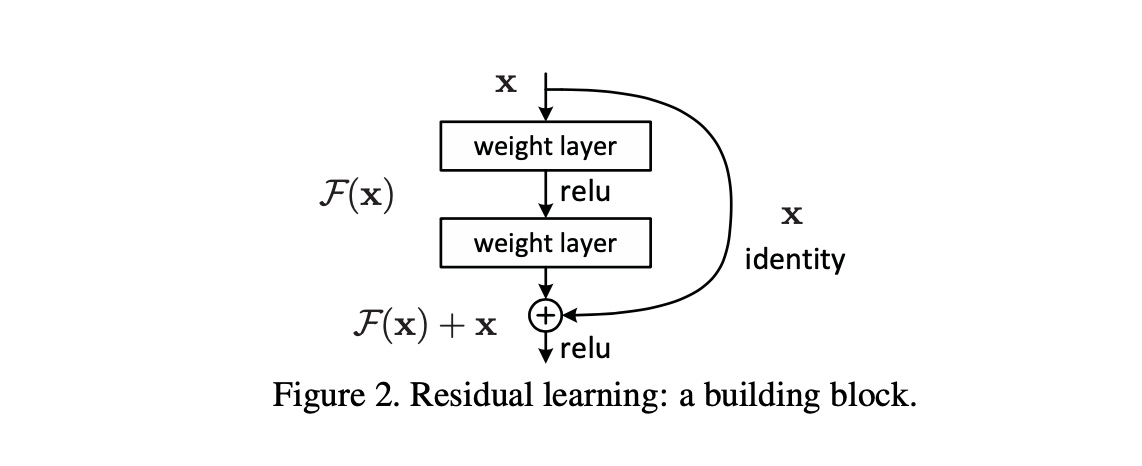
The above picture represents a typical residual block. Which can be represented in a python code as shown below.
output = F(x) + x
xis input to the resnet block and output from the previous layer.F(x)can be a small neural network consisting of multiple convolution blocks.
Implementing resnet in PyTorch
Most of the variants of resnets consist of
- A convolution block (Conv -> BN -> ReLU -> MaxPool)
- ResLayer - 1
- ResLayer - 2
- ResLayer - 3
- ResLayer - 4
- A classifier block with average Pooling and a Linear Layer
Let's build each of these components one by one.
Convolution block
A simple Convolution block is applied consisting of Convolution, Batch Normalization, ReLU, and MaxPooling.
It is pretty similar to the initial layers found in VGG16, but with a larger kernel/filter size of 7*7, stride 2.
conv_block = nn.Sequential(nn.Conv2d(3,64,kernel_size=7, stride=2, padding=3, bias=False), #112,112
                       nn.BatchNorm2d(64),
                       nn.ReLU(inplace=True),
                       nn.MaxPool2d(kernel_size=3, stride=2, padding=1)) # 56,56
Let's say the input tensor is of size 16,3,224,224 (B,C,H,W), the conv layer with stride 2 generates a new tensor of size 16,64,112,112. The MaxPooling layer reduces the height and width further into half.
Residual block
In the torchvision library, we can find 2 variants of Residual blocks called BasicBlock and Bottleneck Block. resnet 18 and resnet 34 uses BasicBlock and deeper architectures like resnet50, 101, 152 use BottleNeck blocks. In this post, we will focus only on BasicBlock to keep it simple.
The BasicBlock is a building block of ResNet layers 1,2,3,4. Each Resnet layer will contain multiple residual blocks.
Each Basic block does the following -
- Apply a bunch of convolution blocks(mostly 2) and add the output straight to the input.
- Or if there is a size mismatch between input and output, downsample the input before adding it to the output.
class BasicBlock(nn.Module):
    def __init__(self, inplanes, planes, stride=1, downsample=None):
        super().__init__()
        self.conv1 = nn.Conv2d(inplanes, planes, kernel_size=3, stride=stride,
                     padding=1, bias=False)
        self.bn1 = nn.BatchNorm2d(planes)
        self.relu = nn.ReLU(inplace=True)
        self.conv2 = nn.Conv2d(planes, planes, kernel_size=3, stride=1,
                     padding=1, bias=False)
        self.bn2 = nn.BatchNorm2d(planes)
        self.downsample = downsample
        self.stride = stride

    def forward(self, x):
        identity = x

        out = self.conv1(x)
        out = self.bn1(out)
        out = self.relu(out)

        out = self.conv2(out)
        out = self.bn2(out)

        if self.downsample is not None:
            identity = self.downsample(x)

        out += identity
        out = self.relu(out)

        return out
Resnet Layers
Each Resnet layer is built using multiple residual blocks. _make_layer function is responsible for building a resnet layer.
- The 1st resnet layer is created with 3 residual blocks with 3X3 convolution and stride 1 (No downsampling is required.)
- Starting from 2nd resnet layers, only the first convolution layer of the first block has stride 2, the rest of all the convolution layers are of stride 1. And also for downsampling input, stride 2 convolution is applied.
- Layers 2, 3, and 4 have 4, 6, and 3 residual blocks respectively.
def _make_layer(block,inplanes,planes, blocks, stride=1):
    downsample = None
    if stride != 1 or inplanes != planes:
        downsample = nn.Sequential(
            nn.Conv2d(inplanes, planes, 1, stride, bias=False),
            nn.BatchNorm2d(planes),
        )
    layers = []
    layers.append(block(inplanes, planes, stride, downsample))
    inplanes = planes
    for _ in range(1, blocks):
        layers.append(block(inplanes, planes))
    return nn.Sequential(*layers)
Classifier block
The resnet architecture has an adaptive average pooling layer at the end followed by a Linear layer. The number of classes is mostly 1000 for pre-trained networks because of 1000 Imagenet categories.
Softmaxis included as part of the loss function.
classifier_block = nn.Sequential(nn.AdaptiveAvgPool2d((1, 1)),
                                 nn.Linear(512 , 1000))
Complete ResNet class
So a simplified version of ResNet class would look like below.
class ResNet(nn.Module):
    def __init__(self, block, layers, num_classes=1000):
        super().__init__()

        self.inplanes = 64

        self.conv1 = nn.Conv2d(3, self.inplanes, kernel_size=7, stride=2, padding=3,
                               bias=False)
        self.bn1 = nn.BatchNorm2d(self.inplanes)
        self.relu = nn.ReLU(inplace=True)
        self.maxpool = nn.MaxPool2d(kernel_size=3, stride=2, padding=1)

        self.layer1 = self._make_layer(block, 64, layers[0])
        self.layer2 = self._make_layer(block, 128, layers[1], stride=2)
        self.layer3 = self._make_layer(block, 256, layers[2], stride=2)
        self.layer4 = self._make_layer(block, 512, layers[3], stride=2)

        self.avgpool = nn.AdaptiveAvgPool2d((1, 1))
        self.fc = nn.Linear(512 , num_classes)

    def forward(self, x):
        x = self.conv1(x)           # 224x224
        x = self.bn1(x)
        x = self.relu(x)
        x = self.maxpool(x)         # 112x112

        x = self.layer1(x)          # 56x56
        x = self.layer2(x)          # 28x28
        x = self.layer3(x)          # 14x14
        x = self.layer4(x)          # 7x7

        x = self.avgpool(x)         # 1x1
        x = torch.flatten(x, 1)     # convert 1 X 1 to vector
        x = self.fc(x)

        return x
In the comments, I have mentioned how output size changes after every layer.
Creating Resnet34 model
To create different variants of ResNets, we just need to pass the type of block and number of residual blocks to be stacked together to Resnet Class. Let's create resnet34 architecture.
def resnet34():
    layers=[3, 4, 6, 3]
    model = ResNet(BasicBlock, layers)
    return model
So, this was our resnet architecture!
Complete code is available at github.
If you want to quickly try out this project or include this in your project then check out JarvisCloud - A simple and affordable GPU cloud platform.
Conclusion
The most important concept in resnet in the residual block. Residual blocks enable building neural networks with 1000's of layers deep. Skip connections without adding much of overload on the network preserves information from initial layers till the last.
We have learned how to build resnet34 architecture from scratch. We can extend it to deeper models like resnet50, 101, and 152 using BottleNeck Block as in PyTorch.
In upcoming posts, we will tackle another architecture ResNext which is built on top of resnet.
ResNets also act as a crucial component in algorithms like SEresNext, unet which is discussed in this blog.
